Thursday, June 30, 2011

What's a Portfolio?

     I've have a few people that have asked me what a "Portfolio" is... I sell sets of handmade Note Cards and I've recently learned how to make my own "Portfolio".  In my description of some of my note cards, I state "comes with matching portfolio" and it's the term used in that context that seems to be causing befuddlement (if that's not a word, it sure ought to be lol)  
     Anyway... the portfolio is a holder for the stationery.  You open it up and there inside are the cards and the envelopes and on some, even a little pocket to hold your stamps.  Here is an example of the portfolio for stationery: (don't forget that you can click on the image to get a bigger view of it.)


     You can see the cards and envelopes tucked behind the vellum pockets, and both sides are secured by ribbon so that they don't flop around.  This set is for sale at my store (see links to the to the right).

Wednesday, June 29, 2011

How to Scrapbook your Greeting Cards

     The top page has a large wired ribbon in the middle of the page.  I did this by first attaching 2 eyelets to my page.  I left the ribbon on the roll because I didn't know how much I would actually use.  I threaded the end of the ribbon from front of the page through the eyelet to the back of the page, then across the back of the page and up the back of the eyelet to the top of the page.  I then cut the ribbon off the roll after guesstimating how much would be need for the bow.  I took both ends and tied them together and snipped the tails so that they would not be overly long.
     The bottom page has a full size greeting card on the left and miniature greeting cards on the right.  I get so many gorgeous cards throughout the year and I hate to just throw them out.  These miniature cards are actually scanned images of the full size cards I received.  I scanned the inside and the outside and then placed the little cards on the page as shown.  These are about 3x3 inches.  I've done an entire scrapbook with nothing but cards that I wanted to keep.  I knew that I couldn't keep all the full sized cards that I receive, there are just too many.  This is a way to keep them and utilized a lot less space.

Using Doilies on Scrapbook page

     The top and bottom pages are using doilies as a mat for the photos.  I first cut the photo to match the center of the doilies (I used a Fiskars shape cutter to do that).  I then rubbed each doilies with a blue ink pad, a gold ink pad and lilac ink pad.  I rubbed the colors on different areas of the doilies but I did cover the whole doily.  I glued the photo to the center and then glued the entire thing to my page. 
     The middle page is showing one way to use the type of brad that has the center cut out.  I threaded a ribbon through the cut out section of the brad and then inserted the brad all the way through the intersection of the ribbons and through the back of the page and secured the legs of the brad with tape.  I like to secure the legs of brads so that the page doesn't hang up when I go to insert the page into the book.

Using ribbon to put a title on your page.


     The top page has a title "Merry Christmas" and this title is actually attached to a ribbon by eyelets.  Put an eyelet on each side of the mat that your title is glued to then measure 2 pieces of ribbon from the center of the page to one side plus about 2 inches extra.  Thread one of the ribbons through one eyelet (using about an inch) and the other thread through the other eyelet.  Secure the back side of the ribbons by using a glue runner or hot glue gun.  Then take the ends of the ribbons and after centering your title on the page, fold the ends around the sides of the page to the backside of the page and secure both ends with tape.
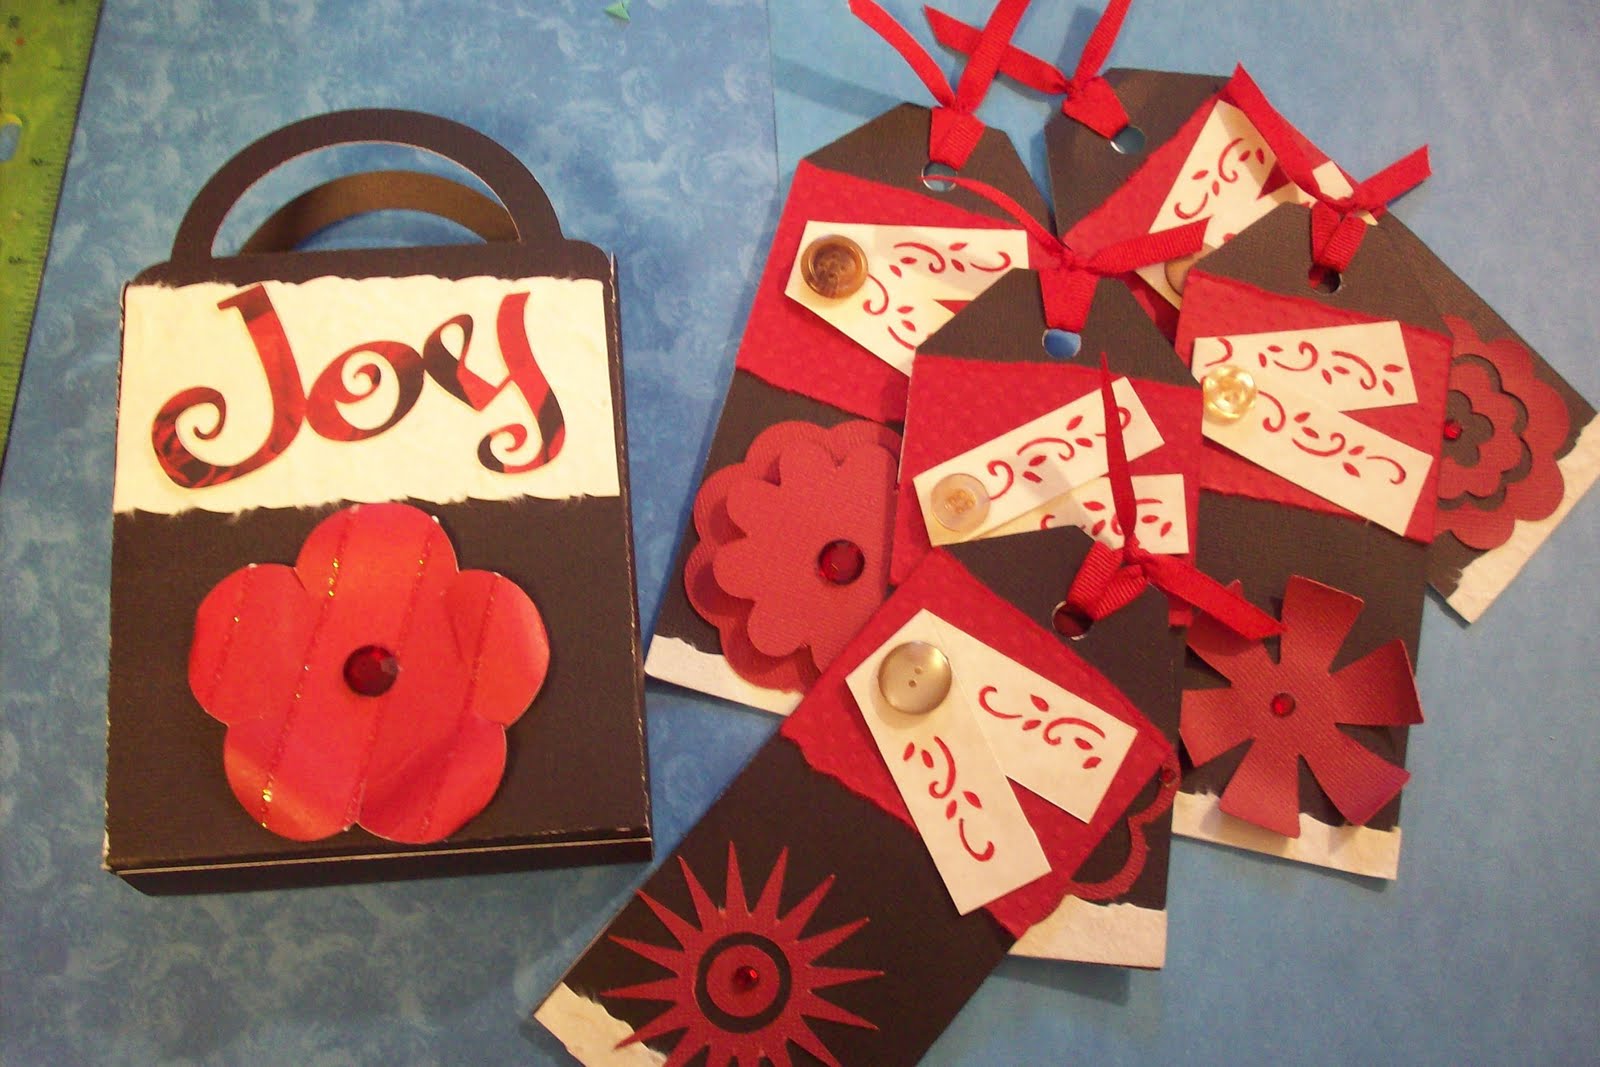
     The middle page, towards the bottom right has a group of 3 buttons.  I actually bought these "buttons" made like this, but I realized they could easily be handmade.  The 3 buttons each have a letter glued to them and together spell out "Joy".  I could cut the word I want, find the buttons that I like and glue the words to the buttons using my glue gun.  I would use the glue gun to glue the buttons to my ribbon or my page.
     The bottom page has a silver glittering frame around the photo.  This frame is actually made of some really pretty Christmas ribbon that I found.  I just measured 4 pieces to the size of the photo and glued them to the photo at the corners.

Pictures on Ribbons


     These are some examples of hanging your photos (or other items) from ribbons.  The top and top right photos are created by measuring 3 lengths of ribbon from to to so they end up being about 12 inchs.  Then cut 3 mat or use tag (see right side photo) You can either glue to mats to to the bottom section of the ribbon or use eyelets and draw the ribbon through the eyelet that you put in the mat.  The top of the ribbon will be folded behind your page and taped down to secure them.  With mine, I used 3 mats, one on the bottom section of each of the ribbons and journaled by story across the three mats.  Then take different size photos and use your glue runner or glue gun to secure them to the upper and mid sections of the ribbons.  It gives a very nice dangling ribbon effect.
     The bottom page uses pretty much the same technique, but all eyelets are used.  After securing your photos to whatever frames/mats you choose, put an eyelet in each one.  I did 3 ribbons and there are 3 photos hanging from each ribbon.  Draw your ribbon through the first photo's eyelet then behind the border at the top and tie the ends together.  Then put another eyelet at the bottom of that photo and get another ribbon. Draw the ribbon through the bottom of the top photo and the top of the middle photo and tie the ribbon.  Repeat this step for the bottom photo so that there are 3 photos tied in a line.  Then repeat this for the next 2 lines of ribbon.

Tips on Scrapbooking (Cropping) memorabilia


     The top page has a patch in the upper left corner and I found that once again, using the tape runner worked very well.  I could also have used the glue gun but it seemed that it was just quicker and easier to run the tape across it.
     The middle page was a different story.  This is a type of armband that was worn on the upper sleeve of my daughter's uniform.  I didn't want to permanently attach the armband so I used 4 eyelets and a thin rope type of ribbon.  I threaded the ribbon up from the back and into the bottom left eyelet, through the armband and then down the top left eyelet and secured the backside with scotch tape.  I then did the same thing for the right side of the armband.
     The bottom page was made to showcase the letters that my daughter wrote to me while she over seas.  I tore one 12x12 page diagonally and used the tape runner to glue the bottom and left side of that paper to the background paper and this created a pocket.  It holds the letters very nicely!

Using Buttons on Scrapbook Pages


     The top set of photos has a gold button that looks like it's been raised off the page.  Actually, this button had a shank on it and I popped the shank off with wire cutters (I think they were wire cutters).  Down towards the bottom on the right is a small group of brown buttons that had no shanks (much easier to work with).  The best way that I found to attach the buttons is using a tape runner.  I tried the liquid glue that is meant to glue heavier objects and it didn't work.  I also found years later that a small bit of hot glue from an ordinary hot glue gun works well also.
     The bottom page show some blue netting at the top with the word "Marriage" glued on it.  This is the page that I made at a large Cropping event.  There was a Cricut machine available to use and I cut the word "Marriage" and "William DePew" and I fell in love with the Cricut.

These are some of scrapbook pages that I made.

     I made all of these pages without benefit of my Cricut machine.  There is only one page that has anything cut by a Cricut on it and I'll explain that when I get to is.  I hope you enjoy these and can find some useful information from them.


     This page was made with wallpaper.  I went to a wallpaper store and asked if they had any of the old sample books that were no longer needed and ended up with an armful.  The pages make great backgrounds and cut outs.  You will find all type of coordinating pages that you can cut things from to complete your page.  If you closely at the bottom image, you might be able to get an idea of the texture of the wallpaper.

Picture of a slouch hat that I would love to have!

     A fellow storenvy shop owner that makes wonderous things in crochet asked if I had a photo of a slouch hat that I've been wanting.  This is for you Over The Rainbow!  Let me know if you think you can do this crochet.  

Tuesday, June 28, 2011

The tags I made for my sister's Birthday...

     Well.... my sister received her gift and she loves them! yay! here are the tags that I made for her:


     I used the Picturesque cartridge to make the butterfly, and cut 2 copies.  I painted both with my pink glitter concoction and then used foam adhesive strips in the center of the 1st layer of the butterfly and attached the 2nd layer.  I then pulled the wings up on both layers to give it that "fly away" look.  I also used the ornamental iron cartridge to add the gate frame to the border of the tag.

Thursday, June 16, 2011

Handmade Crafts

     Hi Everyone, it's another beautiful day in my Craft room. I made another set of lovely gift tags, but I can't list them here right now (shhhhh, they are a surprise for my sister's birthday..)  I should be able to put them up by next week.
      I did want to mention that if you see something you like, please be sure to digg it, or stumble it and maybe drop a comment, thanks!
     I'll be back soon with more stuff!

Sunday, June 12, 2011

Happy Birthday Card using the Ornamental Iron Cartridge by Cricut


     I used the Ornamental Iron cartridge on the Window setting to design this card.  I cut two of the same and used some foam to raise one on top the other.  I also cut the same design on blackout and used that as the very bottom/base of the card.  I cut out a mat and "Happy Birthday" and added some amber bling to the mat.

Saturday, June 11, 2011

How to make Tiny Bows with a Fork!


     I stumbled upon this video on youtube.com that taught me how to make perfect tiny bows using a FORK!  I was flabbergasted and just had to try it out for myself.
     The lady in the video is using a smallish ribbon, but for my first attempt I had a spool of 1 inch ribbon in front of me and just grabbed that to try this out.  It worked! Perfectly!  I made the prettiest bow using a regular kitchen fork.
     If you would like to learn how to make your own perfect-every-time bows, check out the video link:  How to make tiny bows with a fork.

How to make paper flowers

  
   I wanted to know how to make my own paper flowers, so off to youtube.com I went.  I found a video presented by a wonderful lady whose name is Kathy and she made it seem so easy.  Off to the craft room I went with my new found knowledge to try it out.  It worked! It worked beautifully!  My very first flower was amazing when I actually thought "heck it's the first one, it's bound to not turn out".  But nope, turned out great. 
     You don't have to have a cricut machine to make these flowers either.  You can cut out your own 5 petal flower shape and they don't have to be identical in shape, only in size.
     If you would like to learn how to make these yourself, take a look at the video, here's the link:  Make your own paper flowers

Thursday, June 9, 2011

Gift Tag using Picturesque Cartridge


     I need to start taking notes when I'm making different items, it's getting hard to remember which cartridge I used to make what item lol.
     Anyway, I used the Picturesque cartridge on the tag setting to first make the frame that I used for the overlay in the rose pattern paper then I glued that to the tag.  The tag itself was also cut from that cartridge and I glued a base of green patterned paper, then put the frame of the cut out tag on top of that.  I chose the butterfly because I liked how the wings went outside the tag a bit.  I then cut another butterfly frame without the tag and the butterfly shadow.  I painted both of those pieces with my glitter concoction that I made and used a bit of my glue runner to glue the 3 layers of the butterfly together.  I put the glue only on the middle body of the butterfly so that I could then fold the wings inward and give them the lift that they have here.  It looks like the butterfly is just about to fly right off the tag.  
     Then, for the bottom of the tag, I used another patterned paper and the Ornamental Iron cartridge and cut a gate the same width as my tag and attached it.  I did not use any glitter on the gate.
     The tag itself is pretty large, it's 4.5x3.5 and I used the Cricut sampler to cut the "To" and "From" lettering on the back of the tag.

Tuesday, June 7, 2011

Haunted House scrapbook page


     I finished the Haunted House scrapbook page that I specifically made that Haunted House diecut for.  I did say that I would post a picture of the page so here it is :)  
     It's a bit hard to tell from the photo's angle, but the mummy on the right side of the house is a layered diecut and it's from the Happy Hauntings cartridge and so is the black frame on the top right.  The monster coming out of the roof of the house is from the Mini Monsters cartridge.  I used the "Spooky" font from the Happy Hauntings cartridge for the year "1994" at I believe a one inch setting.

Saturday, June 4, 2011

Handmade Gift Bag filled with Gift Tags, using Cricut's Plantin Schoolbook cartridge.


     I used Cricut Plaintin Schoolbook cartridge again to make this gift bag.  This handmade gift bag is also made at 7 1/4 inches and is filled with matching handmade gift tags.  The gift tags are about 5x4 inches and they have "To" and "From" on the back.  I used one of the cricut cartridges for the flowers that you can see on the front of the gift bag and gift tags, but for the life of me, I can't remember which cartridge it was.

Cricut Wall Decor cartridge Castle Diecut

     This is one of the first diecuts that I made when I got my hands on the Wall Decor cartridge by Cricut.  This cartridge is amazing, it makes some of the most beautiful objects and the ability to get some really large and really small cuts is the best feature.  This Castle was cut on pure black textured cardstock (even though it looks kinda brown here... hum) and then I made another cut on the "shadow" feature of my Cricut Expression machine.  This Diecut was cut at 12 inches and I plan on using it with some small photos of my daughter that I have during one of our Disneyland trips.  It kinda reminds me of the "It's A Small World" ride.  I could also use this for the pages that I'm going to do of the day at the Renaissance Fair that my husband and I went to and very much enjoyed.  So many uses... 

Handmade Gift Bag using Cricut's Plantin Schoolbook cartridge.


     This was so much fun to make!  I used the Plantin Schoolbook cartridge from Cricut and my handy fancy edged scissors.  The largest bag that can be made on the 12x12 mat is 7 1/4 inches.  This gift bag is rather small, but it's so cute and so much fun and holds lots of neat things.  

Teapot and Teacup diecut using Cricut Wall Decor Cartridge


     I used the Cricut Wall Decor cartridge to make these beautiful layered die cuts.  The largest Teapot and Teacup were cut at 4 inches, then the 2nd largest were cut at 3 and finally the smallest were cut at 2 inches.  It's difficult to tell here, but all these teacups and teapot diecuts were hand painted with a glitter concoction that I made and it really makes them sparkle!  I cut 3 layers, 2 in matching printed paper and 1 in pink solid paper.  I used the blackout feature for the pink and attached it to the printed paper on the bottom, then I used the other layer (printed paper) and attached some foam squares to give it some lift) and attached that layer to the top layer, creating a raised and layered die cut.

Paper Roses using Sure Cuts Alot 2


     I made these paper roses by following a tutorial that I found on youtube by Kathy whose site is paperphenomenon (I think that's how it's spelled).  These paper flowers are like the Tim Holtz paper roses but he uses a sizzix for his, Kathy uses the George and Basic Shapes cartridges from Cricut on hers and I used basic shapes flower from Sure Cuts A Lot2 for mine.  I had the settings set on Blackout so that it wouldn't cut out the center hole.  These turned out really well.  I experimented with hand painting the paper first with a glitter concoction that I made using half a small container of ultra fine iridescent glitter mixed with modge podge (works really well) for the paper flower on the right.  The paper flower on the left I made first then painted the petals with my concoction.  It seemed to me that the flower on the left was much easier to do and turned out equally well as to the flower on the right.  The added bonus of painting after the flower is made is no down time since I don't have to wait for the paper to dry before assembling my flower.  These were cut at 2.5 inches on thicker paper.
     You can view the items that I have for sale in my shop at NoteletsByDesign

Haunted House die cut using Mini Monsters Cartridge by Cricut


I've been trying out a lot of new cartridges since I got my new Cricut Expression machine and one of those is the Mini Monsters Cartridge.  I made this Haunted this using three colors, yellow for the shadow of the house and the upper windows and door; Orange for the layer 1 of the roof and porch, green for the upper shutters and door frame.  The base of the house was done in black and the house was cut at 7 inches.  The phrase sitting next to the house was cut at 4 inches.  I had a lot of fun cutting this one to use on my own Halloween page of my scrapbook, and I will post a picture of the page when I get it done.
     To see items that I have for sale, please visit NoteletsByDesign.

Boring...

This is an incredibly boring blog so, I've decided to change it.  I'm going to use it to share my handmade creations that I make but don't sell.  I'm off to take some photos of some projects...